July 19, 2025
How To DIY The Ultimate Compact Travel Tripod and Camera Bag Kit
In this article, I will cover how to build your own ULTIMATE COMPACT MINIMALEST TRAVEL PHOTOGRAPHY KIT which is both better and cheaper than anything on the market today. For the inconscpicuous traveler or lightweight adventurer, it doesn’t get any better than this. I put this kit up against anything remotely comparable at any price.
Over the years, I tried a lot of different products and compared countless options online. I hate shopping and everything I found sucked. Frustrated by the enshittification of literally everything around me, I decided to see what I could come up with by trying to improve the stuff I already had and which was readily available on the used market. And that is how I stumbled upon the holy grail, or, what I have dubbed “The Ultimate Compact Travel Photography Kit”, for lack of a better or more fun sounding name.
The kit consists of primarily two things: 1: A lightweight and compact but fully capable tripod with interchangeable center column and removable head, and 2: A cheap but dependable camera bag modified to contain a hydration bladder (a feature found almost nowhere else). This kit was optimized to be ultra-functional and ultra-minimalistic specifically for my own personal use where function and minimalism are criticial. It is the result of my many years of refined in-the-field experience to be the most inconspicuous, fastest to deploy, go anywhere/do anything travel photography kit in the smallest space possible. For proof of its effectiveness: look anywhere on this blog. I am a long-time adventurer and this is the gear that I depend on. It has been put to the test and it has been regularly abused in some of the most demanding environments and it has proven itself and it’s better than whatever you’re using.
This article is NOT an advertisement.
I am NOT selling anything.
This is merely a guide covering the functionality of a kit which you can build yourself for far less than the cost of inferior products.
Please appreciate the fact that I am providing this free of charge and without monetization or advertisements because monetizing and putting ads on everything is lame as hell. That shit sucks and I’m fucking tired of it being everywhere.
This article is a lot of words, so to summarize the entire thing:
In order to build “The Ultimate Compact Travel Photography Kit”, you simply take the legs off a “Compact Action” tripod and install them onto the main spider assembly from a Manfrotto 785B. The center column can be modified as-is or you can replace it with a carbon fiber tube for reduced weight and increased maximum height. The head can be any head you want, but the best ones are the Manfrotto heads which use the original version RC2 platform components (the new RC2 stuff has been enshittified). I prefer the 484RC2 head. The 496RC2 is an excellent choice, but is bigger and heavier. For the bag, you simply make three strategically placed cuts in order to fit a hydration bladder into the rain cover pocket. It’s pretty easy.
Save money, stop contributing to companies who keep making shit worse and easily do this yourself.
This is twenty years of my experience in optimizing and improving my gear and my processes for quality, longevity and frugality.
TL;DR
- Features and Specs: Ultimate Travel Tripod
- – DIY GUIDE -Ultimate Travel Tripod
- Features and Specs: The Camera Bag with Integrated Hydration Bladder
- – DIY GUIDE -Camera Bag with Integrated Hydration Bladder
Disclaimer
The following paragraphs contain my own independent thoughts, opinions and experiences. I have no affiliation or communication with any company. Any links provided are not affiliate links. If your company got its feelings hurt because I wrote something negative about you, then try making better products that don’t suck. Also: I’m not responsible for anything you do based on this guide so as with any DIY: proceed at your own risk.
Background
I’ve spent the last two decades consistently adventuring harder than most people and traveling to places where I often need to be fast and inconspicuous. During all this time, I’ve been on a quest for the ultimate travel photography kit that could keep up with the rigorous demands of travel and fairly extreme adventures in general. I’m not saying that to make myself sound like a cool tough guy (we already knew I was anyway), but to emphasize that I have taken this stuff into sewers, caves, rooftops etc. I needed a dependable solution that would go anywhere and do anything and not draw unwanted attention. By the time the gear I had started out with early on needed to be replaced, it was all discontinued so I was forced to shop around and in the process try many different bags and tripods on the market and I reached the conclusion that… they all suck. This inspired me to get creative and make my own solution based on what was available on the used market. Not only does my DIY solution achieve every goal I set out to reach, but it outperforms everything else I’ve tried and it doesn’t stand out. It is also much cheaper to go this route, but admittedly that’s partially because you have to go to the used market where everything is generally cheaper… but that’s also because the original items are discontinued and nobody currently makes anything as good as what you can put together yourself using the below guide.
The information which I’ve documented below represents many years of meticulous refinement and optimization with the simple goal of ultimate efficiency and capability. Price was NOT and is not the driving factor in my quest; I would have gladly paid more for “better” stuff if that was an option, but it wasn’t and it still isn’t. I just wanted something solid and dependable with common-sense features that were strangely not found anywhere else. As it turns out, in this case the “better” option is also the cheaper option as long as you can hack it together yourself. Over the years, I made modifications here and there to various components but the core/base materials used in my ‘ultimate’ kit are simply modified versions of the same stuff I’ve been relying on since about 2007 or so. But that’s not because I didn’t shop around and try just about everything else first. I tried all that, then discovered that they all sucked, so I decided to double down on what I had and just get resourceful in finding ways to improve what I already had.
At this point, it’s been a full year since the last major update to my kit and I can find nothing left to improve upon. To be clear, this is merely the final revision in what’s been an ongoing evolution of the same gear I’ve been using for roughly two decades now. This “final version” of my kit has been proven in the field on over a dozen adventures now including multiple trips across the country and it hasn’t let me down yet. Not a single leak, tweak, break or inconvenience. Just non-stop action.
Like me, this kit is perfect.
The Gear
My photography kit, as previously stated, consists of two main components: 1: A lightweight and compact but fully capable tripod with interchangeable center column and removable head, and 2: A cheap but dependable (discontinued) camera bag modified to contain a hydration bladder (a feature found almost nowhere else). Additional gear includes: one large camera, two lenses, multiple headlamps, a flashlight, a video light, a microphone, 8 AA batteries, 2 spare camera batteries and more stuffed into a very small bag. Altogether, fully loaded, it weighs in at ~14.5 lbs total including the water. That might sound like a lot but have you ever weighed yours (including water)? I’ve helped a lot of friends through a lot of tight spaces and the bags some of these people drag around are so heavy and bulky that they are truly a liability. At 14.5 lbs, I can comfortably run with mine on my back and it easily fits into any of the smallest spaces that my body fits into. This means that I can out-run you while I’m wearing the equipment which itself out-runs your equipment. Try me. Try the kit. FAFO.
The most novel or unique aspect of this kit is the hydration bladder which has been integrated into the camera bag by the use of some careful cuts in the inner seams. When I started this quest, I couldn’t find ANY camera bags with integrated hydration packs. But now I see that while some are being made, they are all bulky monstrosities and only one seems to be in regular production with all the others I found going to dead links. The integrated camera bag/hydration pack’s lack of popularity/acceptance is probably due to the perceived risk involved in mixing water and photo gear.
The other key component of my kit is the tripod which I’ve assembled from various sources. This is among the lightest travel tripods out there. AND it folds up smaller yet extends farther than most other tripods in this category. It’s also all black with no flashy logos or colors (you can remove the lowepro tag off the bag and buy multiple tripods so that you can replace the leg that has the logo painted on with spare blank legs which have no logo).
There is a risk to everything we do in life. There is also a risk to your camera gear if you don’t put your tripod together correctly and fail to test it out safely. Any risk this kit actually poses to my camera gear is far lower than the risk many environments and sketchy situtaions are to both myself and my camera gear, so for someone like me, this is a no-brainer.
If you are competent and can figure out how to make things work and you actually think about things and bother to test your stuff before running off to the wilderness to try it out, then there’s no greater risk going DIY than using any other product on the market.
It seems, however, that most people are, in fact, too dumb and/or incompetent and/or careless to handle such a big responsiblity so if this is you then I recommend you don’t try any of this.
PART I – The Ultimate Travel/Adventure Tripod
I have been using this same tripod platform for most of my career over the last 20 years because it does exactly what I want. And when I needed to, I was able to completely disassemble and upgrade it fairly easily. This “ultimate” version is merely the refined and perfected version of what I’ve been relying on for all of my work. I have been using the exact tripod pictured (in rotation with my small army of identical clones) for many years now. This is a proven piece of gear that I use regularly and this tripod is as good as it gets.
Specifications
Compare these specs to any other tripod on the market and you might start to see what makes it so special:
- Max height: 60″ (with 10″ center column tube*. It can reach 65.5″ with a 40cm carbon fiber tube {and even higher with a longer one})
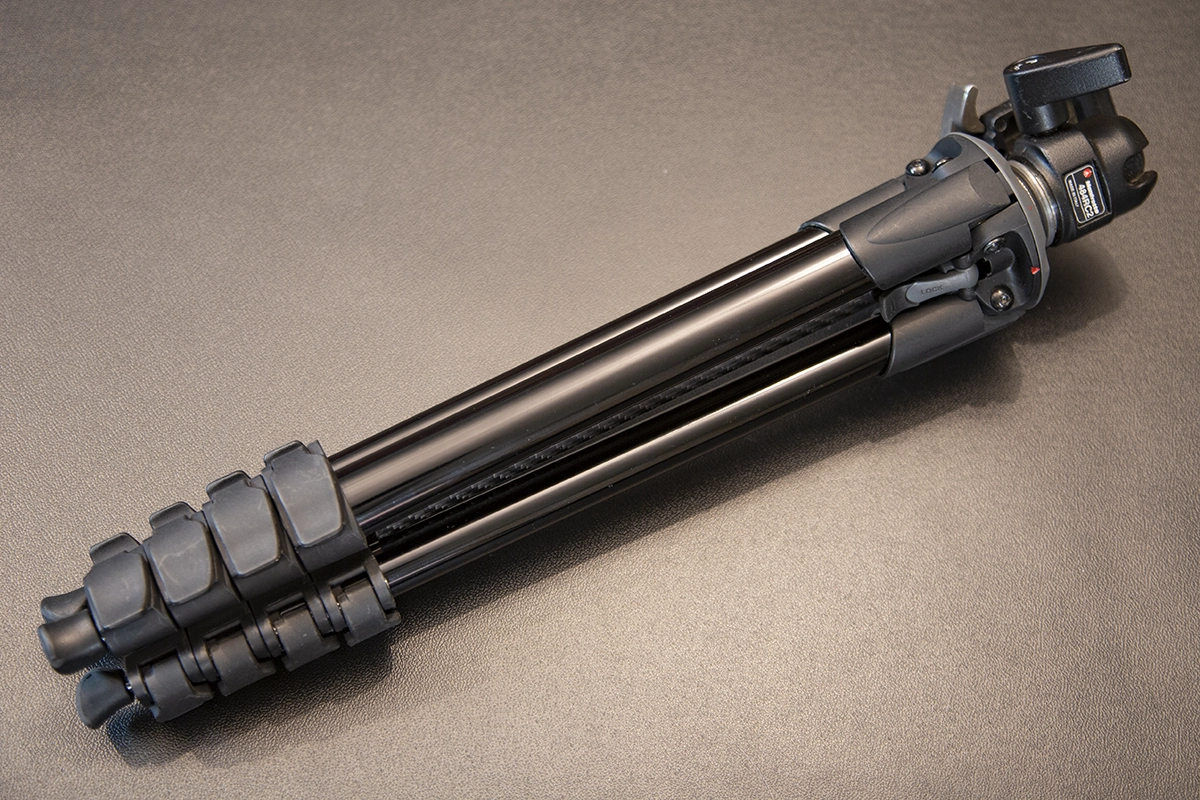
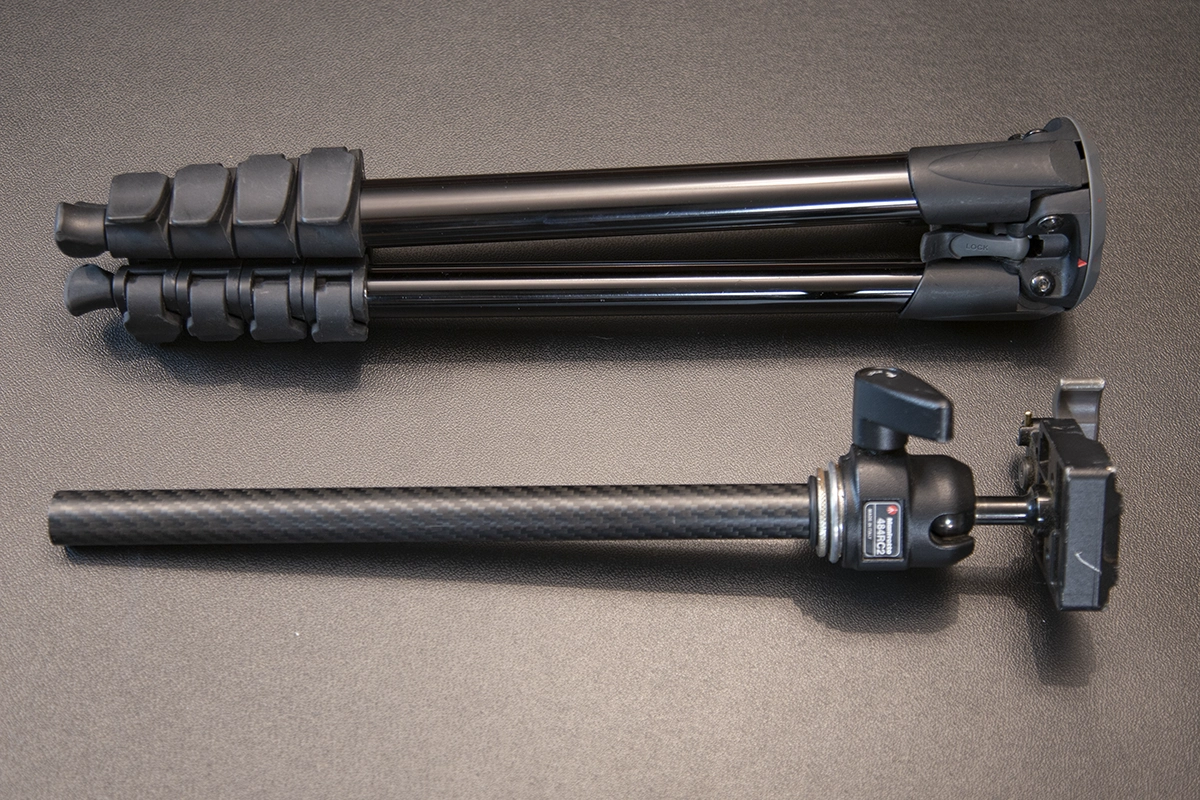
- Minimum length: 14.5″ (with head removed)
- Closed length: 17.5″ (with head attached)
- Closed width: 3.25″
- Weight: 1224g (2.698lbs)
Max height is measured from ground to camera plate with legs fully extended and spread out. The only real limit to the maximum height is the length of your tube and how well your camera balances on it. OE Size center column tube is 9.75″ long. With legs at full width, max height for OE aluminum tube is 59.75″. I moved to a 10″ carbon fiber tube (60″ max height) and now use a 16″ tube (65.5″ max height).
Features
What makes THIS tripod so special? Everything. But also nothing. Everything about this tripod is the best features of any travel tripod rolled into one straightforward plain looking workhorse.
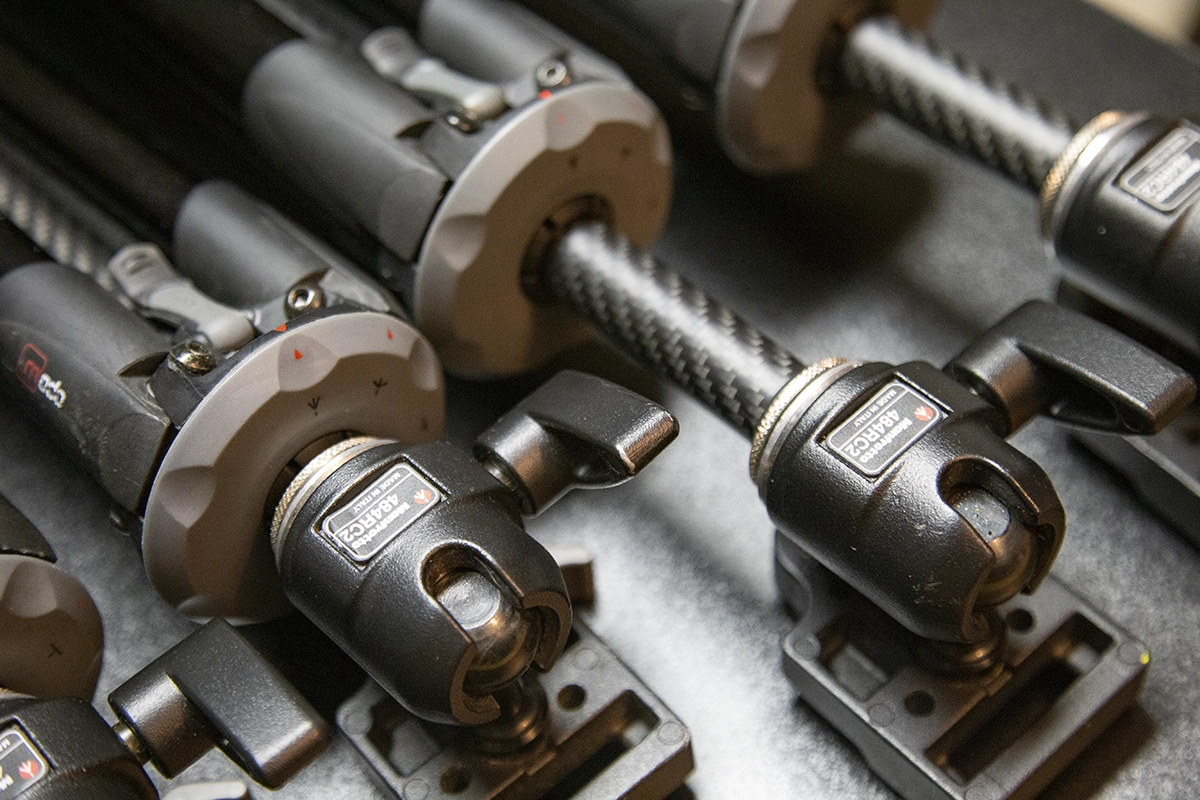
In any good travel/adventure tripod, the most important aspect after size and weight is the locking mechanism employed. Levers are the superior option for speed and ease of use. Every single adjustment on this tripod is done with a simple lever which can be operated with one hand. In describing the various components of this tripod, a good place to start would be the head. And in this case, my choice is the (discontinued) Manfrotto 484RC2. I believe this is the best head for travel/adventure because this head has just one ambidextrious adjustment mechanism and it’s a lever. The best part about the head, though, is the RC2 quick release plate system. It has a spring-loaded lever that locks open. When you press your camera with plate down into it, the lever snaps closed and locks the camera in. To remove your camera, just flip the lever. There is no faster camera plate attachment/detachment system. The head is also designed such that it can aim straight up or straight down. This is due to cutouts in the front and back of its body and having these two cutouts means you can aim down or up faster than if you only had one cutout and thus had to spin the body as needed to line up the one cutout with your subject. I use big heavy cameras with big heavy lenses and this head does its job despite its low weight rating. But you could always go with a larger head with higher weight rating and more adjustment mechanisms if you needed to, such as the 488RC2, 496RC2, etc. I don’t recommend any of Manfrotto’s new heads because in their infinite wisdom, they changed the RC2 system, changed the levers, removed one of the cutouts and made them overly flashy in appearance (they’re also no longer made in Italy). The center column on this tripod is also one lever which makes height adjustments fast and easy. And the legs are all lever clamps. I can unlock all the leg clamps in about 1 second (you can pop all 3 clamps per leg at the same time) and extending the legs takes about one more second because they drop straight down using gravity. Then, you can lock the clamps in groups of 3 as well, by wrapping your hand around the whole tripod and closing each group of clamps starting at the top and working your way down for a total leg deployment time of about 5 seconds. If your head is locked and upright with the plate lever locked open, there is no additional time needed to attach your camera than simply setting your camera down onto it. As with each individual feature on this tripod: there is nothing faster or easier to use. Who wants to sit there and twist individual knobs to loosen or tighten each section? Why is there even a market for twist style locks?
Nothing about this couldn’t be done by just about any company today.. especially Manfrotto, the company whose parts these are! But for some stupid reason, they never assembled all these great parts into one great tripod. Instead, they built a couple of separate and very mediocre tripods. Most of these components are Manfrotto parts/designs therefore they deserve all credit and praise for their ease of use, efficiency, speed, etc. Manfrotto COULD make this tripod today. But don’t and they won’t. So do it yourself and save money!
I confidently put this tripod up against any tripod on the market. It wins in all categories: smaller size, lighter weight, taller max height, faster speed, better ease of use, least visible/attention grabbing, etc. Also: price. I am openly challenging anyone to find or make a better tripod, let alone one that compares for the price. Spoiler alert: You won’t.
Ultimate Tripod DIY Guide

What you need:
- Manfrotto 785B (~$30 on ebay)
- Manfrotto (/Joby) Compact Action (~$20 on ebay or $79 new)
- Manfrotto 484RC2 (~$30 on ebay)
- Manfrotto 088LBP adapter ($20) -OR- Oben 3/8″-16 to 1/4″-20 Reducer Bushing 5-pack (8.95)
- threaded rod, locknuts and 2x well nut. 1/4″-20 thread for all (~$15)
Total before tax: ~$115
Tools:
- Hammer
- Drill and bit
- A punch tool
- Allen wrench
- Multi-purpose glue
- Basic ratchet, 7/16″ or 11mm deep well sockets, extensions and wrenches
Difficulty level: I don’t know. “Easy” to “Moderate”? Can you use a drill and a hammer without hurting yourself?
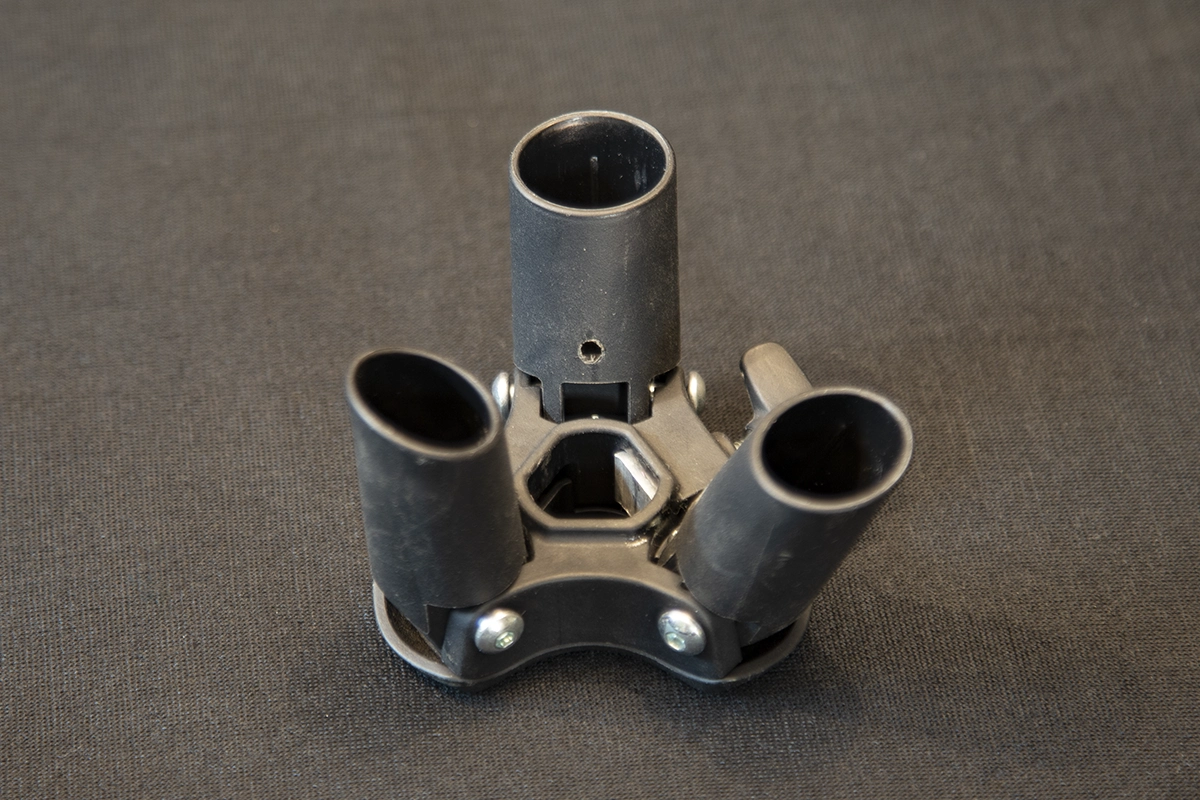
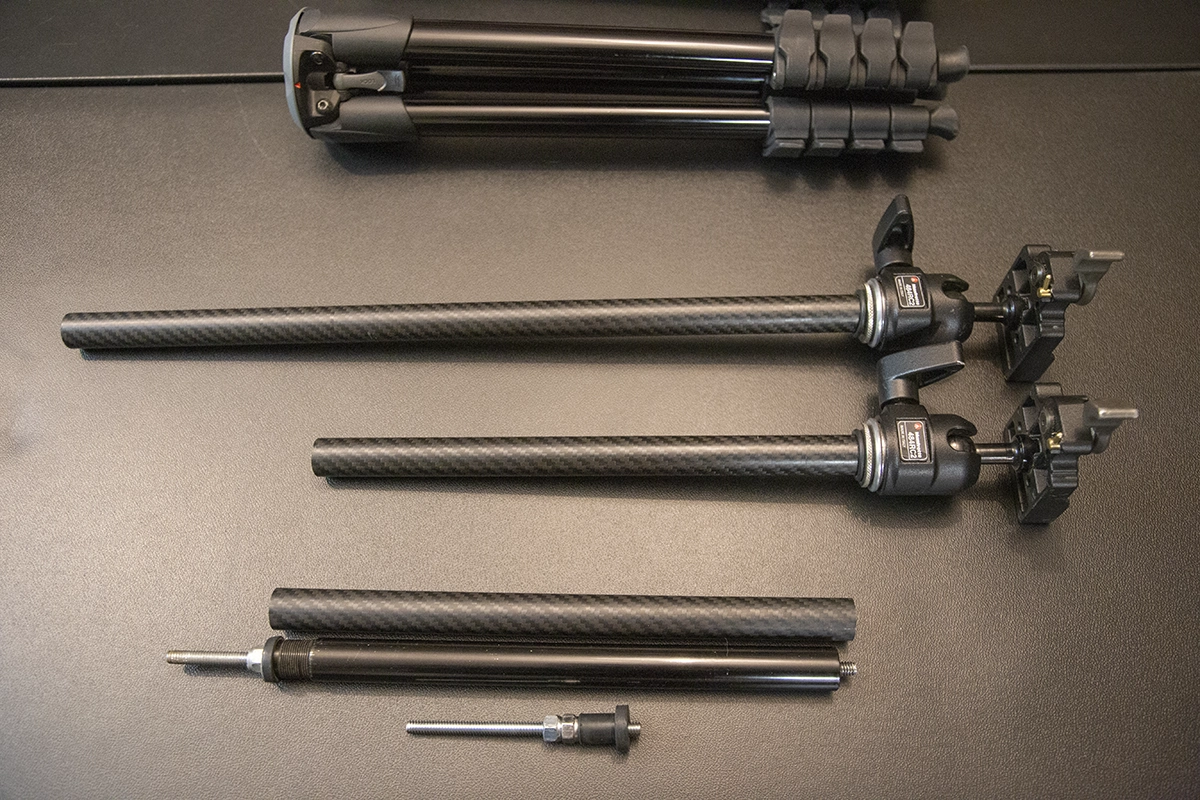
The main body for this “ultimate” travel tripod (diagram), as well as the top leg attachment joints (diagram) are from the discontinued Manfrotto 785B tripod. The legs are from a different but similar tripod by Manfrotto (/Joby) called the “Compact Action” tripod*. I will subsequently refer to these as the “785B” and the “C-A” tripods. *there is an identical and fully interchangeable “Compact Action” tripod made under the same name by ‘Joby’ who, I assume, is just a subsidiary of Manfrotto. These are available at places like Best Buy so that hopefully means their parts will be easy to get a hold of for a long time to come. Both the 785B and the Compact Action tripods came with really stupid non-removable heads which should be thrown in the trash immediately. The heads on these things are the main reason these tripods were never super popular because they’re useless garbage and weren’t made to be removable. Luckily, the tube on the 785B can simply be unscrewed from the head portion and flipped upside down to be repurposed.
The main reason for this annoying leg swap procedure is because the 785B is notorious for the leg clamps breaking which makes the legs completely unreliable. Many broke off on mine and most 785Bs on ebay are bound to have a broken clamp or two and if they don’t it’s only a matter of time. The other reason for this is that the newer version, the “Compact Action” tripod, uses a vastly inferior body with a stupid twist lock mechanism AND a proprietary triangular center column with a non-removable head. The legs on this new model were only changed slightly, and in an uncharacteristic move for companies like this, the changes were a significant improvement; The new tripod legs got better lever clamps, better feet and slightly longer tubes which meant it was a smidge taller. The body and non-removable head, however, are discardable garbage.
One of the hardest parts of this DIY job is disconnecting the legs from the C-A tripod by drilling out the rivets in the attachment joints (NOTE: there’s an ALTERNATE option below if this doesn’t sound doable for you). What I refer to as the “attachment joints” are the plastic parts at the top of the legs through which the screws go to connect them to the body and into which the leg tubes are inserted (see diagrams in above paragraph). These joints are nearly identical to the 785B tripod’s joints, but just different enough to not be compatible (which is really stupid from an engineering perspective). If they would have just re-used the same joints they wouldn’t have had to re-engineer their tooling and they would have saved us all this trouble. Sigh. See this photo of the two side by side with Compact Action on the left and 785B on the right; the difference is just enough to render them not usable. Right. So you have to liberate the leg tubes from the top plastic joint. I used an appopriately sized drill bit to knock out the rivets. Then I pulled the entire leg assembly out and discarded the C-A’s inferior body and attachment joints.
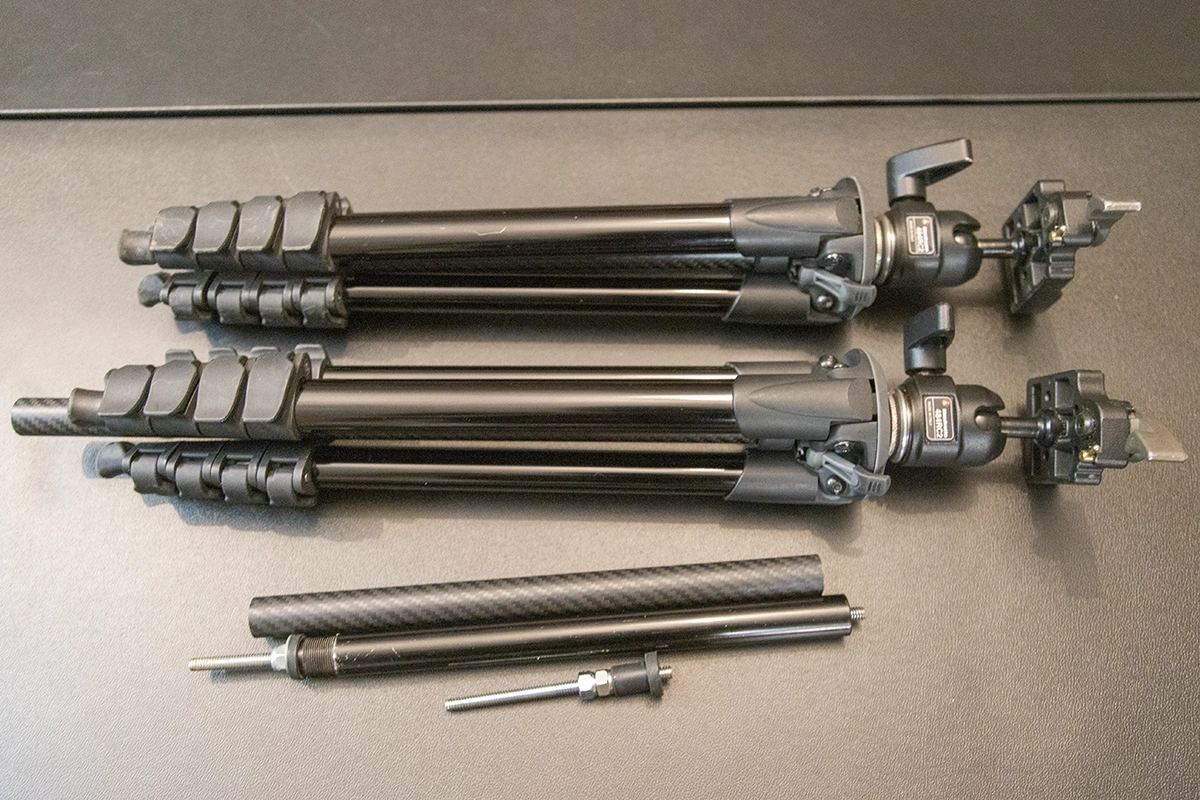
The other hardest part of this is removing the legs from the 785B. The goal is to discard the legs from the 785B but keep the main body assembly and upper joints. On the 785B, the legs are just glued in to the joints but there’s also a slight lip that they sorta lock into. I found it’s best to unscrew the entire leg (with joints and all) from the body (being careful to not lose the washers) and stick a screwdriver through the screw hole to hold the joint down (for example, on a soft ground like carpet with your foot on the screwdriver) while you pull hard enough to remove the leg tube but not hard enough to break the joint (I haven’t broken one yet, but I assume it could happen). It helps to leave the leg assembly in the sun for a while to loosen up the glue and carefully rock it back and forth and/or twist it a little while you pull. A light cracking sound should indicate that the glue has loosened its grip. Some are more difficult than others; Out of a pile of 15 785B legs, I ended up with two that I couldn’t disconnect in this manner. In some cases, you may have to wedge a very thin flathead screwdriver into the top of the leg. The goal is to bend the tube away from the lip inside the joint. See this photo for an example; the red oval indicates the tube circumference and the green dots indicate the bent tube after performing this operation. Bending the tube in this way should free it up enough to be pulled out successfully. Once the 785B’s legs are removed, discard them and install the C-A’s legs into the joints/body from the 785B. I used glue to secure them. Be sure to push the legs fully into place otherwise they won’t be even lengths. Once the glue dries, install the legs into the body and you’re done with the hard part.
ALTERNATE/EASY option: If you can’t remove the legs from the 785B’s joints successfully, all is not lost: The leg tubes are sligtly shorter on the 785B, but the tubes and downstream parts are interchangeable; you can combine 785B and C-A leg tubes. By disassembling the clamps (by lightly hammering out the dowel pin with a punch [and carefully keeping track of the small plastic parts inside the tube]) you can disassemble the legs themselves at each clamp. For this, we only need to disconnect the top/outermost tube via the top/largest clamp. In this manner, you can use the joint and TOP leg tube from the 785B with the clamp and subsequent lower leg assembly from the C-A tripod WITHOUT having to drill out rivets/etc as described in the above two paragraphs. The leg will, however, bottom out when closing them up because of the shorter tube on top, but in my experience it was fully functional and I used it like that until I got enough spare parts to complete the job. I would recommend avoiding going this route if possible since they weren’t designed to bottom out like that and over time you might damage the interior components, but if you’d rather not have to drill out the rivets and remove/re-glue the legs, this may be an alternative solution. It would at least be a good way to try out the “ultimate” tripod without committing to the harder steps above to see if you like it. Lastly, I should note that those small internal plastic pieces are, as far as I can tell, interchangeable between the 785B and C-A, so if you build a small army of these tripods like I have, it is worth hanging onto some of the legs for spare parts.
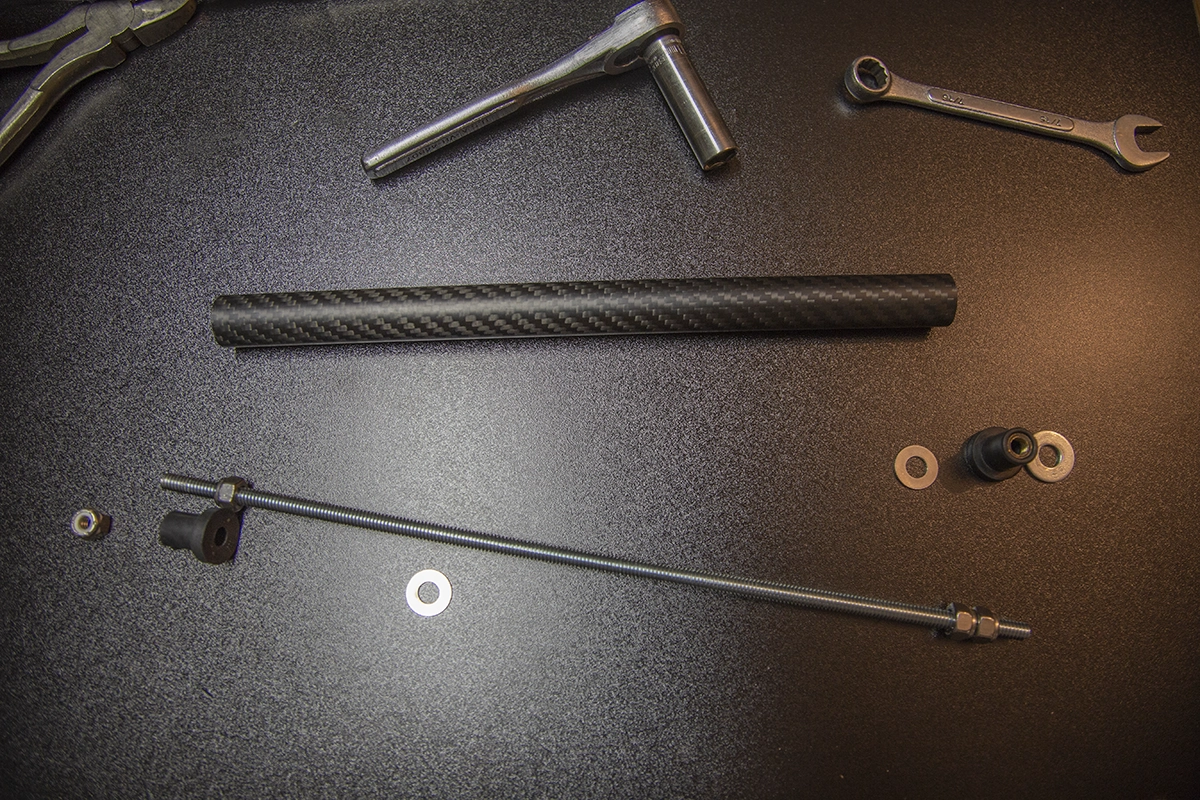
With the legs done and attached to the body, the next part is the center column. You can just reuse the original aluminum center column tube from the 785B if you have one; It easily unscrews apart and you just flip it upside down so the threaded end is at the bottom and doesn’t interfere with the body. I use a 19mm OD (17mm ID) carbon fiber tube instead because it is about one ounce lighter, and longer (depending on length of tube you buy), than the 9.75″ OEM aluminum tube. To attach the head to the tube, you need to get a 1/4″ -20 threaded rod 12″ in length, 1/4″ -20 locking nuts, a couple 1/4″ -20 well nuts and a Manfrotto 1/4″ to 3/8″ adapter #088LBP. On the head end, you attach a lock nut about an inch from the end of the threaded rod and then a rubber “expanding well nut” against which the locking nut pushes when tightened, causing the well nut to expand inside and thus grip onto the tube. This photo shows the final positions of the two nuts on the inside of the rod. These are the nuts against which the rubber expanding nut pushes against to expand, so their position is important in getting things as tight and secure as possible. I usually grabbed onto the center of the rod using a vice grip to allow me to twist that first locknut down (which chews up the threads, hence grabbing it at the center). Alternatively, you can install a second locking nut on one side to use as your tensioner so that you can tighten the nut on the opposite side of the rod; two nuts are harder to turn than one, therefore to turn a nut on the far side of a threaded rod, put two nuts on the opposite side. If that still doesn’t make sense, well I don’t know what to tell you. I also typically shave off the lip of the well nut so that the whole thing fits flush inside the tube. See what that looks like here. Top that off with the Manfrotto adapter #088LBP. On the bottom end, you simply throw another rubber well nut and another lock nut to secure it. You tighten this nut against the manfrotto adapter which provides tension from the head end. I used vice grips to lightly grab onto the adapter being careful to not chew it up with the vice grips. I don’t bother to trim the bottom well nut, but depending on how tight your build is, it may be necessary to trim the overhanging squished rubber so that it can easily slide into the tripod body. Otherwise, you can always just remove the head and adapter and slide it up through the tripod. See what the bottom end (on an OE aluminum center tube) looks like here and what it looks like (on a carbon tube) just prior to installation here.
Advanced Method
If you’re looking to shave off another couple ounces of weight, you can use a much smaller piece of threaded rod (4″ vs 12″) and use a 7/16″ socket with various extensions to reach all the way through the tube to tighten it on the inside, but this is the advanced method. Failing to correctly secure the 4″ rod could result in a catastrophic failure involving your camera being destroyed by falling from the tube when at a sharp angle. ONLY DO THIS IF YOU CAN DO IT CORRECTLY. If you are incompetent DO NOT ATTEMPT. 99% of people should just go with the full 12″ threaded rod instead. Using a short rod is much more difficult to get centered/tightened and to keep the whole thing solid. It takes some trial and error and you will probably destroy them before you get it working. Speaking of which, you can experiment with washers and rubber grommets, etc, to go around the rod inside the tube to keep it centered and help secure in the tube.
Here’s a photo of the best method I’ve found for assembling the 4″ rod. To the left is the bottom, to the right is the top. You’ll want to add another locking nut on the bottom side to act as a tensoiner to keep the bottom rubber piece from expanding before the top one. Explained in more detail below. This will require common (but very specific) hand-tools to complete partially due to the tight clearance involved (it has to fit inside a 17mm ID tube). See example here of the random assortment of extensions and things I had laying around to use and just do something similar. The socket will need to be deep enough to clear the rod as you tighten.
The only thing not shown in that photo (other than the tensioner nut) is the top expanding well nut-because I already trimmed and stuffed into the tube. The expanding well nut should have the nut end facing out with the trimmed lip end facing down inside the tube. This is what it looks like from the top here. The washers allow the nuts to tighten against the rubber expanding nut with reduced friction and thus expand them. So in this case, if you do it right, both expaning nuts will expand and secure the rod effectively in the tube (just not at the same time). You want the expanding nut at the top (head) end to expand and fully tighten first-before the bottom one. I’ve found that this is best accomplished by adding an additional nut onto the bottom end of the rod, seen here. By adding a nut on the end, you should have enough friction to be able to tighten the whole assembly into the expanding nut at the head of the tube without expanding the expansion nut on the tail end until it’s time to do so. The goal is to only have the socket interacting with the bottom, tensioner, nut. If you tighten both at the same time, you’re defeating the purpose of the tensioner nut. It’s a little tricky, but doable once you get the hang of it. Only once the head end is as tight as possible and you have about a half inch of rod sticking out of the top (for mounting the adapter plate/tripod head onto), you then should be able to remove the second nut on the end (or both simultaneously, whatever works) to then tighten the inner bottom nut into the expansion nut to secure the rod on the tail end. Again, this is the advanced method and it’s tricky to get it right, but these can be made solid enough to support a full size camera and lens safely. I’ve been using them for over a year now. If you’re too scared or incompotent to trust in your abilities to make the shorter rod work, then just go the easy route and use a 12″ rod. It’s much faster, safer and easier to just use a 12″ rod. But I am competent and unafraid and I can attest to the sturdiness of the advanced 4″ rod method when done and tested correctly.
Lastly, since the head accepts 3/8-16 threads, I’m pretty sure you could use a 3/8″-16 threaded rod with nuts, etc, of that size and do away with having an adapter at the end, but that’d probably be heavier overall and I’ve found that the big Manfrotto adapter helps keep things together and provides an interface to tighten against between the head and tube, so I just go with the 1/4-20 rod.
What I’m saying is the tube can be configured in a variety of different ways so just do whatever the hell you want. The most important part, after doing it correctly is TESTing your work. TEST IT OUT. Don’t be stupid. Make sure it’s solid. Mine are solid.
And just like that, you can build the greatest travel tripod on earth for less money than any other comparable tripod.
PART II – The Camera Bag with an Integrated Hydration Bladder
Specifications
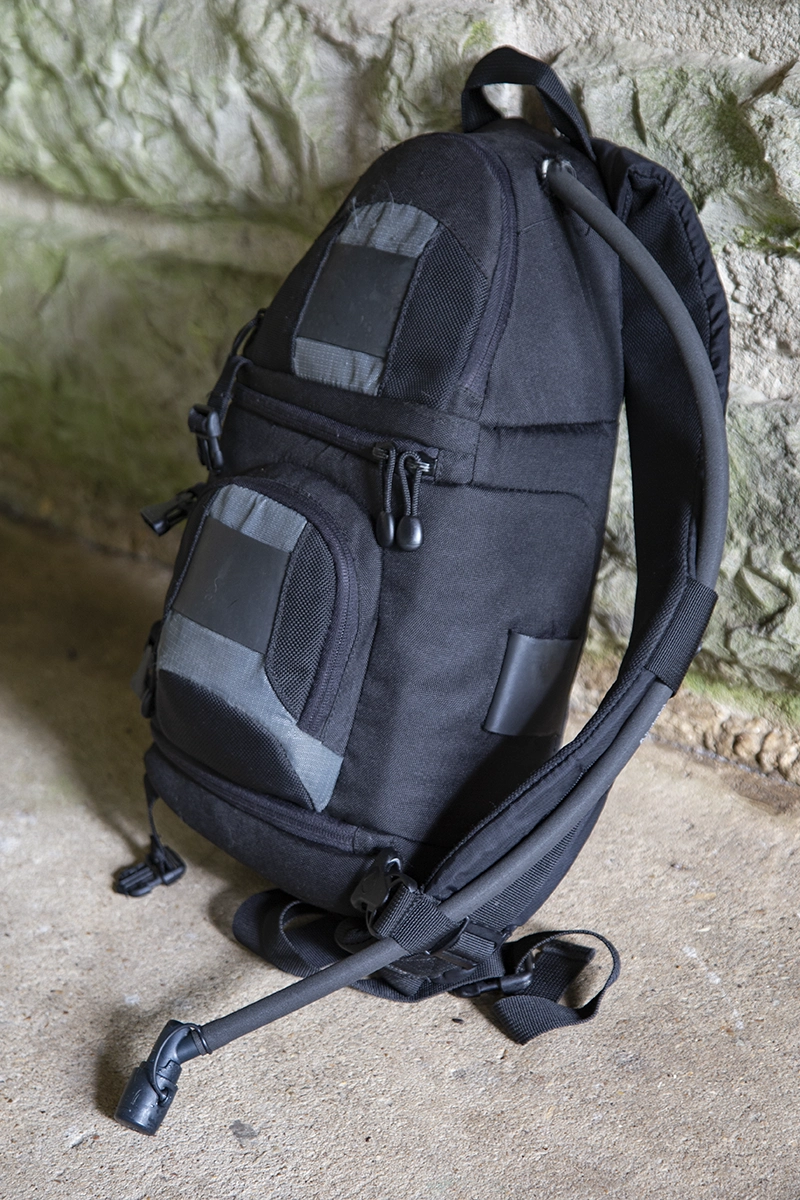
- Lowepro 100AW*
- Exterior Dimensions: 8.1 x 6.7 x 15.7″
- Interior Dimensions: 7.5 x 5.1 x 9.8″
- Hydration Bladder: 1.0L with 36″ insulated tube (24 ounce maximum capacity in this kit)
There are FOUR versions of Lowepro camera bags that I have confirmed work with the hydration bladder hack: 100AW, 200AW, 102AW, 202AW
The bag I use is a Lowepro 100AW. Yep. It’s not mind blowing. In fact, it’s probably the most basic and mass produced camera bag of all time but sadly it has been discontinued for a while now and its current replacements all suck and are not able to be modified in this manner. The AW stands for all-weather. This means it has a rain cover that folds up into a pocket on the back. It’s a rather small bag but its small size has forced me to maximize space efficiency and as a result, I carry everything I need for just about any kind of photography adventure and it doesn’t weigh me down or get in the way. One thing that I always struggled with was the lack of water while out adventuring. Being such a small bag, there wasn’t room for a water bottle inside it and no place to strap one on outside. I found that the compartment I normally use for my flash was just the right size to hold a square 20-ounce “Gatorlyte” bottle, as long as you jammed it in crooked, but that meant leaving my flash behind. That also meant any leak, such as the cap not being on tight, would be disastrous. I began my search for a replacement bag that was similarly compact but which could also safely store 20 ounces or more of water. After a long and fruitless search, I ended up back where I started when I made the discovery that blew my mind and revolutionized my travel photography kit; This hidden functionality is actually VERY EASY to unlock and it has been the biggest upgrade for all my subsequent adventures and it remains the most unique part of this whole kit.
The 100AW fits my minimalistic approach to travel/adventure photography, but if you need more space, the larger 200AW is also compatible with this hack. And since writing this guide, I found that the bag’s successor, the 102AW and 202AW are FULLY COMPATIBLE.
I want to stress again that this is no longer a prototype – this is the final version of a working product. I have now been using this exact bag with this exact hydration bladder pictured for over a year now. I have relied on this setup on various trips locally as well as across the country; through mountains, swamps, industrial sites, overgrown woods, etc. It is a thoroughly tested and proven modification.
DIY Camera Bag with an Integrated Hydration Bladder – 24 Ounces Max
What you need:
- Lowepro 100AW or 102AW [-or the larger 200AW or 202AW] ($20-30 on ebay)
- USWE 1.0L Elite Hydration Bladder With Plug-n-Play and Hydrafusion Tube Kit ($42) [-for the 200AW and 202AW, use the larger USWE 1.5L Elite Hydration Bladder With Plug-n-Play]
Total before tax: $72
Tools:
- A sharp knife
Difficulty level: “Easy” as long as you can use a knife without hurting yourself.
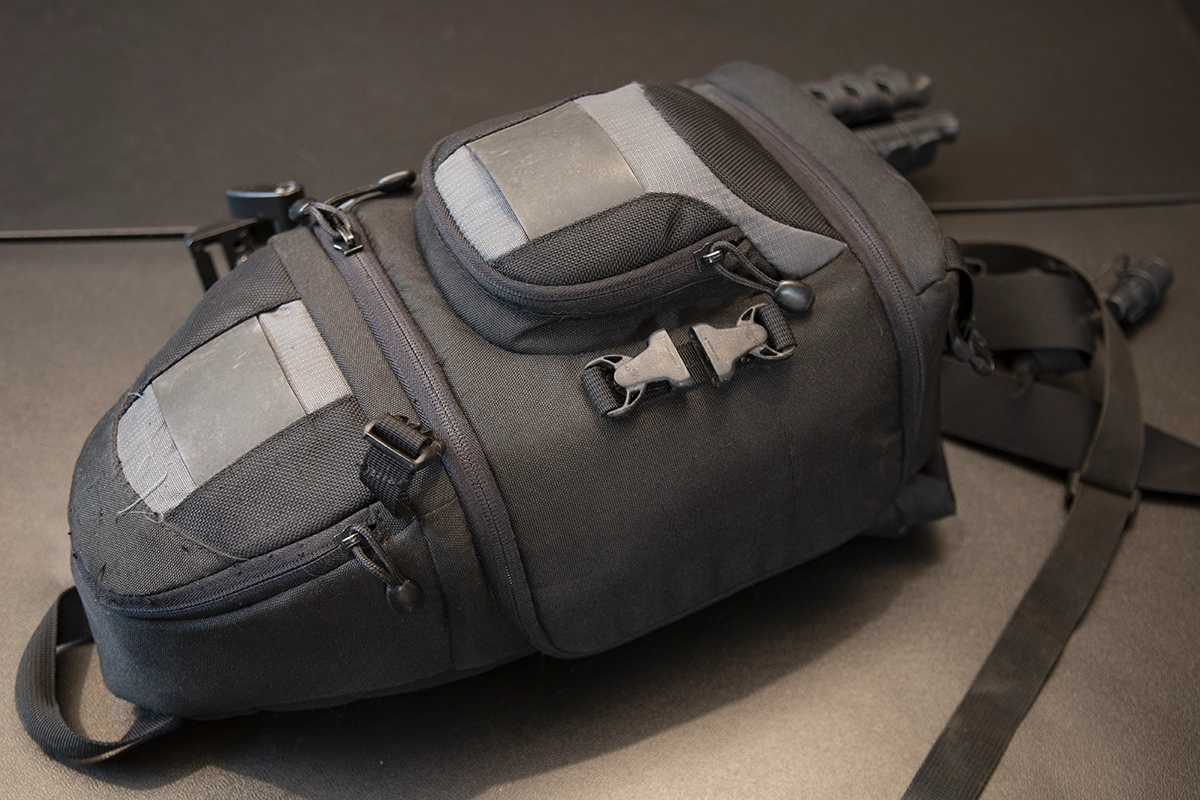
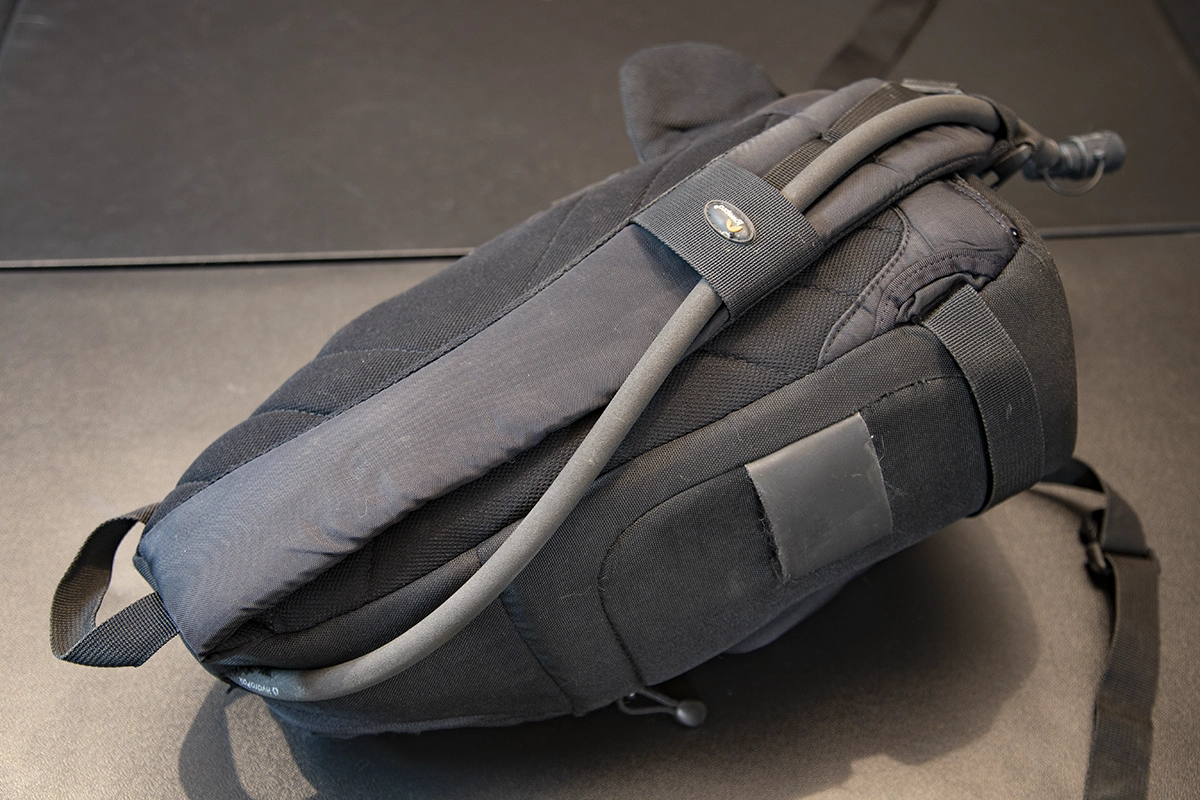
The rain cover pocket on the back of the Lowepro 100AW, 200AW, 102AW and 202AW happens to be the perfect place for a hydration bladder with just minimal effort involved. This pocket ends at a seam about halfway up the length of the bag. Take a sharp knife and carefully cut along that seam to open it up as wide as possible on the inside. You can only really fit one arm in there at a time, so it’s tricky doing one handed but as long as you’re careful and guide the blade with your finger, I’ve found it can be done and I haven’t cut my fingers off yet. But you do have to be careful. The next step is to open up the small top pocket and cut the backing seam along the curve of the bag from one end of the elastic pocket strap to the other. See this photo for visual confirmation. You ONLY need to cut the thin grey material and ONLY on the inside of the seam/border. Once that’s done, to create a route for the drinking tube to get back out of the bag, just make a small ~1 inch slit in the exterior of the bag near the strap, about an inch away from it so as to not compromise the strap’s structural integrity (see the photo for visual reference).
Fold the backing down and you will find a white foam padding beneath, seen here. This foam padding should not be removed, but be kept against the INside of the bag. The hydration bladder goes between the foam padding and the material which comprises the OUTSide of the bag. This is the default orientation since the seam inside the rain cover pocket is on the OUTside of the foam so just don’t go removing it or anything stupid. Place the hydration bladder into the rain cover such that the back of the bladder is against the rain cover and the front of the bladder is partially covered by the rain cover.
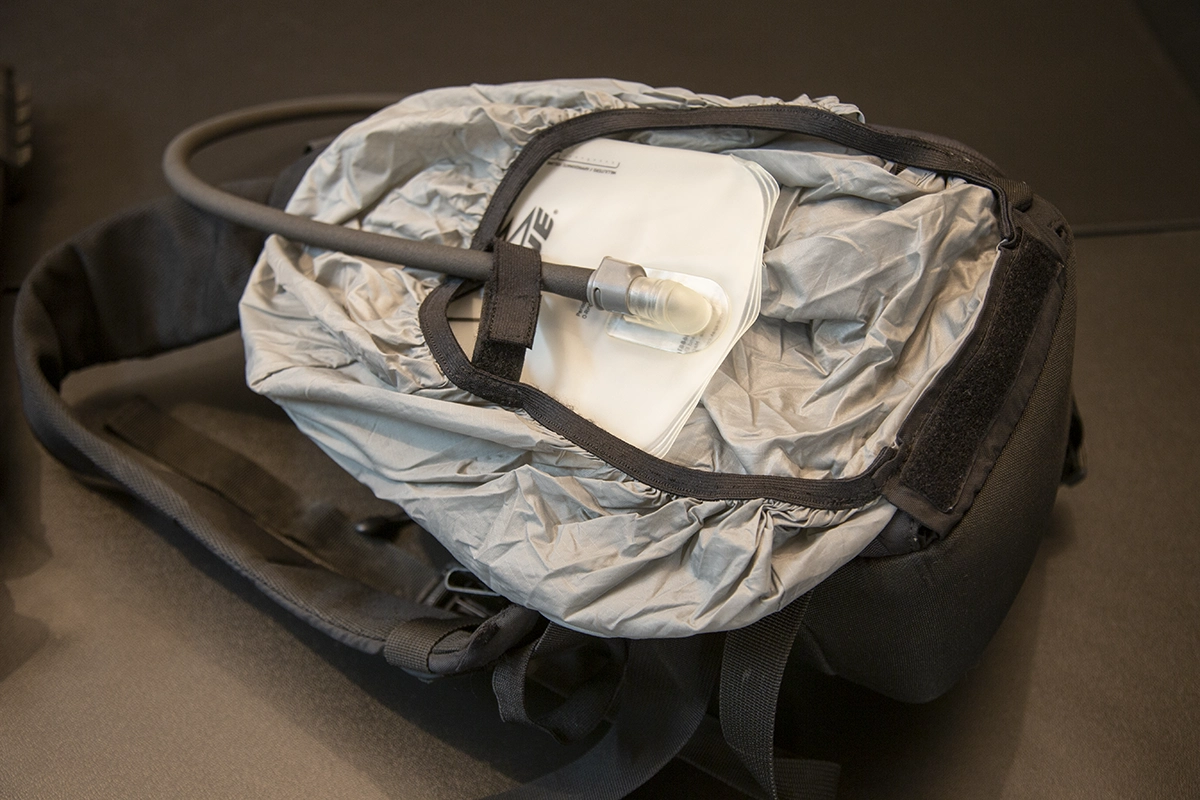
Now this is the fun part… You want to pick up the hydration bladder at the top by pinching the rain cover down onto it to hold it in place correctly. You’ll start to run the drinking tube from the rain cover pocket up into the top pocket through the cut open seam (see prior photo here). As you get the tube started through, you’ll need to simultaneously start pushing/pulling the bladder into the pocket. I tend to use my right hand, gripping onto the top of the bladder, to push it into the rain cover pocket while occasionally pulling the drinking tube from the other end via the top pocket. This is how it looks at the halfway point. Keep going with this push/pull process until the bladder is fully inserted and basically can’t go any further due to the top plastic clamp of the bladder hitting the sides of the inner seams. The tube will then be routed from the inside of the top pocket through the exterior 1″ hole in the bag and up onto the strap where it is held in place on the strap further down where there is a convenient cross piece for the buckle to tuck it into. Note that this modification does not change the functionality of the rain cover at all, except while the bladder is installed. With the bladder removed, the rain cover works exactly as before.
NOTE: DO NOT EXCEED 24 ounces of water in the 100AW bag.
The USWE 1L hydration bladder has a capacity of about 33 ounces of water. And that’s probably perfectly safe in a normal hydration pack. When crammed into a Lowepro 100AW, though, 24 ounces is about the maximum I’ve been willing to try due to the tight conditions inside the bag with all my gear and weight pushing against it etc. 24 ounces of water does bulge the rear of the bag out against my back and is not awkward or uncomfortable but it does seem like the the limit for both the safety of my camera and for comfort reasons.
The white foam padding on the inside is one layer of defense in case of a leak. But what’s even better is the that by installing the hydration bladder inside of the rain cover as I have shown in the photos, then you “should” be completely protected from water getting into the camera bag from anywhere except the bottom of this pocket which would be facing down and below all your gear while it’s still on your back. That’s two layers of protection against water leakage, one of which is water proof. If it leaked under any normal situations, while you’re wearing the bag, then you’ll feel water dripping down the back of your shirt/pants long before the water made it past the rain cover AND the foam. BUT remember: you do this at your own risk and I cannot be held responsible for your own bad luck, weird situations or incorrectly modified modifications. This hydration bladder hack has been working great for me and at this point I won’t go without it.
BOOM! An easy modification to make your old camera bag compatible with an integrated hydration pack!
I highly recommend USWE’s hydration bladders. I also recommend their “Hydrafusion” insulated tube kit. I have no affiliations with them.
The cool thing about this discovery is that if, for some dumb reason, you want to be weighed down with a bigger bag, the Lowepro 200AW and 202AW are ALSO able to perform this magic trick AND USWE makes a 50% larger 1.5L hydration bladder that fits perfectly inside it! The 200 series bag holds about 36 ounces of water comfortably. I have verified the 200AW bag is compatible with this modification and with the 1.5L bladder inside it. The instructions for modifying the 200 series bags are exactly the same as the 100AW. This means more options and thus more value out of this little hack as well as a whole new life for all those old lowepro bags!
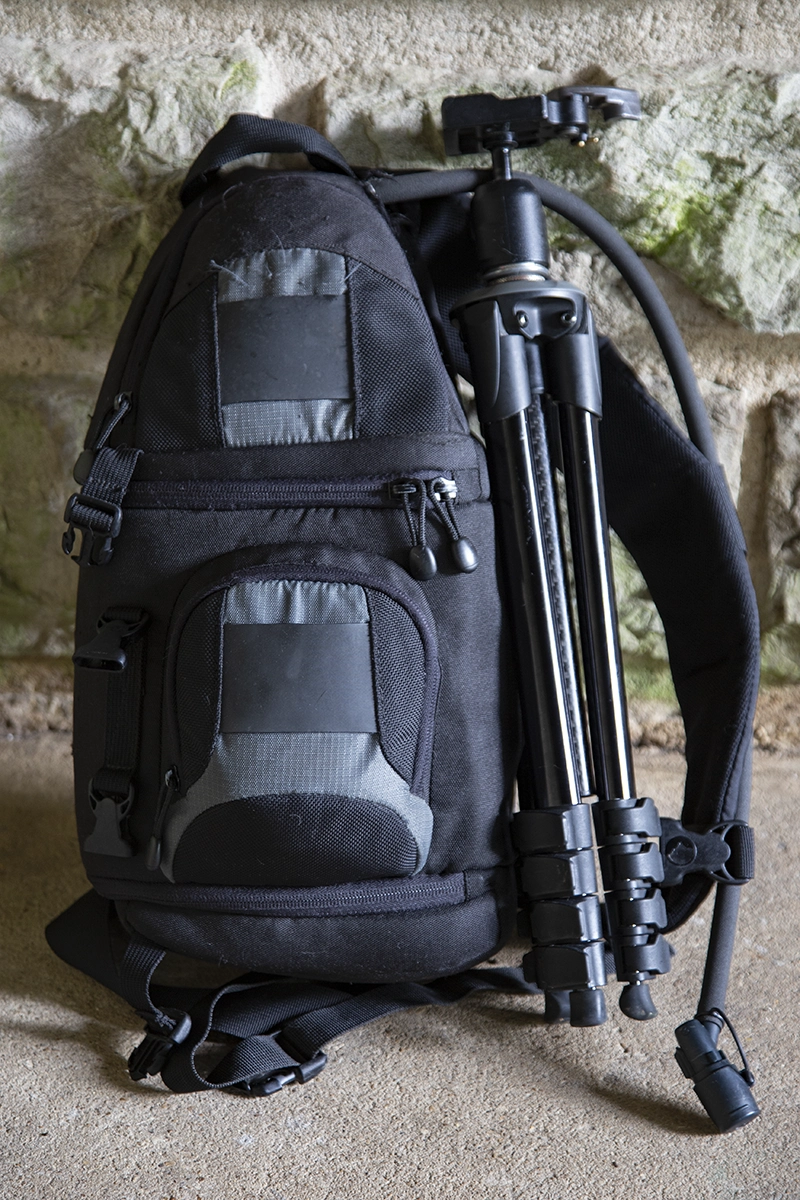
Another thing I particularly like about this kit is the ease with which the tripod slides into the loop on the side of the bag. Without looking, I can (usually) remove or insert my tripod into the loop one handed while it’s behind my back. No stupid clips or straps to mess with and no faster or easier way to sheath and unsheath my tripod.
The Catch
Here’s the catch. And it’s not really much of a catch. But. Seeing as how the bag wasn’t designed to hold a hydration bladder, it’s not the quickest thing to insert or remove. For best results, you should take most stuff out of the main compartment and the top pocket. This allows you to push with one hand up through the rain cover pocket and pull with the other hand through the hole in the small top pocket. You wouldn’t want to do this in the field, except in an emergency or something. I should add that this has never yet failed me and shows no signs of doing so. The hydration bladder has never fallen or come loose or slid out or anything like that. It remains in place and it works as intended and is just about the most efficient and convenient method by which you could ever hope to have a hydration bladder integrated into a camera bag.
Having a mouthpiece attached to my camera bag comes with one extra risk that normal people wouldn’t normally experience, but: There have been times where I’ve crawled through godawful filth and contaminated the mouthpiece. So you do have to be careful where you’re sticking that thing. Sometimes the risk is too great to go putting it back in your mouth. In which case, bummer dude. The good news is these mouthpieces are easy to disassemble and clean. And if you get the quick connect tube then the whole thing can be taken apart and put back together or replaced in sections as needed.
This part should go witohut saying, but don’t be stupid. Don’t leave water in the bladder with all your camera stuff inside the bag and just toss it in the closet or something! That would be really dumb. I always remove the bladder, empty it and leave it drying out immediately after I return from an adventure.
Lastly, 24 ounces is not a lot of water. But it’s a lot more than none. It typically lasts me about a full day of exploring a single location but I am also fairly careful to conserve it. It really depends on the weather, levels of exertion, etc. This is enough water to get me through several hours of moderate activity but it is not enough water for a long strenuous hike in the wilderness. On the trip to Skaguay, for example, I finished off a 3L hydration bladder before I even got to the plant (before the hike was halfway over) which sucked. As with anything, plan accordingly. One trick to help conserve the water is to carry some hard candy or cough drops; It helps keep your mouth and throat from drying out. Otherwise, I rely on having plenty of water in the car and I only drink out of the hydration bladder when I’m actually out adventuring.
Having 24 ounces of water in a hydration bladder which is integrated into my camera bag has been an absolute “game-changer” for me and it is absolutely a necessity in my kit now. As someone who has been doing this stuff for 20+ years, this is one of the best gear upgrades I’ve found. I wouldn’t have bothered writing all this out otherwise. Take my word for it or don’t but I’m actually out here using this stuff.
But Wait There’s More!
The Backpack
There are times where you may not even want to be seen with a tripod hanging off your camera bag, no matter how plain the outward appearance of those items may be. You may also want room to carry additional items like some spare snacks, clothes, etc. The Outdoor Products Quest 29L backpack is the perfect companion piece. Both the Lowepro 100AW and the 200AW fit inside the main compartment alongside the Ultimate Travel Tripod you just put together. This is exactly what I have been doing for years now on the longer hikes out into the wilderness. The Quest backpack is conveniently also equipped to hold a hydration pack. I use a US military surplus MOLLE II 3L hydration pack which you can often find for $20 online. I throw the whole thing in there versus taking the bladder out of its carrier and it is a tight fit and the top kinda bends down a bit but it works great. I have also taken the bladder out and stuck a piece of cardboard in the pocket with the bladder to keep it from getting punctured by my tripod or something, but I feel better with it in the milsurp pack it was designed to be in. With this backpack, you’ve got plenty of extra zippered compartments for stuff. This further solidifies this kit as the most modular and expandable lightweight and compact travel/adventure photography kit you can reasonably buy or build yourself.
And now I’ve shared all the most valuable insights I’ve gained throughout my experience with you. Congratulations.
If one person out there finds any of this useful then it was worth doing this very tedious write-up.
Closing Thoughts / Critiques
For camera bags, I was initially drawn towards the Hazard 4 lineup, particularly the Freelance sling. It sucked. Not only is it very small, the interior is completely modular which is another way of saying nothing really stays in place. And modularity is meaningless if you can only really arrange things one way without blocking off 33% of the usable space inside. So dumb. But the worst thing about Hazard 4 is their straps. On their slings, the straps come straight off the back. This means they DIG IN to your neck and the bag doesn’t sit comfortably on your back as a result, so they stupidly hang crooked… which is apparently exactly how they intended these things to be worn. A comically bad design.
Among all the tripods out there today, I looked at Smallrig, Three Legged Things, Peak Design, Ulanzi, etc. The Smallrig travel tripod was actually a decent, solid tripod in its own right, but had a weird non-removable head, was too flashy colored and, despite being a “travel” tripod, it was too long to fit in my large backpack so that got returned. Three Legged Things were a contender but they are just too big and heavy for my purposes.
The Peak Design “travel tripod” is a far greater abomination than all the others. For starters, the base model costs FOUR HUNDRED DOLLARS while being almost a FULL POUND HEAVIER than my DIY tripod. Even their carbon fiber version is STILL HEAVIER than my DIY tripod and that one costs SIX HUNDRED DOLLARS. But wait, there’s more! Their latest and greatest “Pro Tripod” and even the “Pro Lite” versions are EVEN MORE STUPIDLY EXPENSIVE and STILL A FULL POUND HEAVIER than my DIY tripod and TWO INCHES LONGER WHEN COLLAPSED, which means that at over 19 inches it doesn’t fit into my (or most?) average sized backpacks. Even on their own site, I saw enough not-great reviews about their various proprietary components breaking (they have a non-removable head) which convinced me to never give them my money even if I could live with myself for spending such an insane amount of money on such a heavy so-called “travel” tripod. It also has very wide legs which means it wouldn’t be possible to attach to my bag via the strap loop. Oh and get this. They also sell little feet (separately) to make your overpriced tripod “ultra lightweight” (by removing the legs which makes it so short it’s basically useless?). While I’m busy talking mad shit on Peak Design, which they deserve every bit of, their selection of ugly bags appears to be nothing more than overpriced $300 backpacks for which they sell camera bag inserts (separately, of course) which you then stuff inside their backpacks. Apparently, they still haven’t figured out how to design a proper camera bag. And they seem to think “sling” is just another word for “flimsy fanny pack” with no actual slings for sale anywhere on their site. “Peak Design” they are not. To be fair, though, their tripods do have one spec which beats out my DIY tripod and that’s the advertised weight capacity. This one spec advantage might come in handy if you… regularly travel with giant telephoto lenses that weigh 30 pounds? I’m not sure who does that. Higher weight capacity is a good thing for sure, but I use a standard heavy full size camera with standard lenses and my gear falls well under the much lower advertised weight capacity of either of my heads of choice (the 484RC2 or the beefier 496RC2). But now I’m tempted to test the real-world weight limits of these heads with my DIY tripod just to see if Manfrotto was simply being extremely conservative in their estimates. I’m not sure how accurate PD’s capacity limit is either though, for that matter.
Manfrotto was the biggest disappointment of all because they used to be the GOAT. Manfrotto developed the single greatest tripod head and plate system back in the day; The RC2 Quick Release system is the fastest, easiest and most solid of any kind I’ve ever used. They even have an RC2 plate thats compatible with the industry standard Arca-Swiss mounts. Their old ball heads that went with the RC2 system were functional, ambidextrious and indestructable and could be operated with one hand. Furthermore, you could bludgeon someone to death with a tripod equipped with one of their heads and the head would survive with nary a scratch. Naturally, they’ve since changed everything to be less functional, more expensive and needlessly flashy. Manfrotto’s tripod offerings these days are a dizzying array of overpriced, overly flashy, rapidly discontinued nonsense and the very definition of over-engineered. They suffer from the same problem every other company seems to which is that they want you to buy much more expensive and over-engineered flashy abominations that cost way too much, which are constantly being re-designed and discontinued. Manfrotto was once the greatest tripod gadget manufacturer on the planet, but they have turned their back on the brilliant designs and the customer base that made them what they are today to cater to a strange niche of evidently rich knobheads who use large tripods for purposes I still don’t understand. They’re not “studio” tripods and they’re not travel tripods. Who is the intended market for that stuff? Manfrotto tripods are now like the 21 speed ultra-specialized mountain bikes of the tripod world with no real place in the market now that they’ve basically ruined/killed off the old indestructable RC2 system.
DIY FTW
The DIY Ultimate Compact Travel Photography Kit which I have presented here is far better and much cheaper than any of the other garbage I’ve come across in the last decade or so of actively keeping my eyes out on gear. And as long as you build up a lifetime supply of these things while they’re still available on the used market, you, too, will never have to shop for another camera bag or tripod again. Before writing this article, I stocked up on enough of these things that I sleep comfortably knowing I will never have to shop around for such equipment ever again.
The tripod perfectly slides into a loop on the side of the camera bag which, when modified to hold a hydration bladder, forms the
ULTIMATE TRAVEL PHOTOGRAPHY KIT
AND IT KICKS YOUR PHOTOGRAPHY KIT’S ASS
GET WRECKED, DWEEBS